Download Google Lens For Mac and Windows PC
Thanks For Install , Here is the guideline How to use this extension.
SmartLens AI – The Best Free Alternative of Google Lens for PC, Windows & Mac
Looking for Google Lens on your desktop? SmartLens AI brings powerful AI image analysis directly to your Chrome browser! This is a simple, easy-to-use Chrome extension that lets you search, detect, and analyze images with a single click.
Why Choose SmartLens AI?
SmartLens AI is the perfect Google Lens alternative for PC users. Whether you’re on Windows or Mac, you can now enjoy Google Lens-like features right in your Chrome browser – completely FREE!
KEY FEATURES:

AI Image Analysis (Detect Image)
- Analyze any image using advanced AI (powered by GPT-4 Vision)
- Get detailed descriptions of what’s in the image
- Identify objects, people, places, and more
- Works with any image on any website
OCR Text Extraction
- Extract text from images instantly
- Copy text from screenshots, photos, documents
- Supports multiple languages
- Perfect for copying text from images
QR Code & Barcode Scanner
- Scan QR codes from any image
- Read barcodes instantly
- Get links, text, and data from QR codes
One-Click Image Download
- Download any image with a single click
- No need to “Save As” – just click and download
- Fast and easy image saving
Webcam Capture Support
- Capture images directly from your webcam
- Analyze captured photos instantly
- Perfect for scanning documents or QR codes
Image Upload Support
- Upload images from your computer
- Drag and drop support
- Paste images from clipboard
- Analyze any image file (JPG, PNG, GIF, WebP)
Visual Search (Search Similar Images)
- Find similar images on the web
- Reverse image search functionality
- Discover where an image appears online
HOW TO USE:
Method 1: Right-Click Context Menu
Step 1: Install “SmartLens AI” extension in your Chrome browser
Step 2: Right-click on any image on any website
Step 3: Select “SmartLens AI” from the menu
Step 4: Choose your desired option:
• Analyze with AI – Get AI-powered image analysis
• Extract Text (OCR) – Copy text from the image
• Scan QR/Barcode – Read QR codes and barcodes
• Search Similar Images – Find similar images online
• Download Image – Save the image instantly
• Copy Image URL – Copy the image link
Method 2: Extension Popup
Step 1: Click the SmartLens AI icon in your Chrome toolbar
Step 2: Choose one of three tabs:
• Upload – Upload an image from your computer or paste URL
• Camera – Capture image using your webcam
• History – View your previous analyses
Step 3: Select analysis mode (Analyze, Extract Text, or QR Code)
Step 4: Click “Search with SmartLens” and enjoy the results!
🎯 PERFECT FOR:
✅ Students – Extract text from textbook images
✅ Researchers – Analyze and identify images
✅ Shoppers – Scan QR codes and barcodes
✅ Content Creators – Quick image downloads
✅ Developers – OCR and image analysis
✅ Everyone – Google Lens features on desktop!
🔒 PRIVACY & SECURITY:
- No data collection or tracking
- Images are processed securely
- No account required
- Your data stays private
📋 SUPPORTED PLATFORMS:
✅ Windows PC (Windows 10, 11)
✅ Mac (macOS)
✅ Linux
✅ Chromebook
✅ Any device with Chrome browser
🆓 100% FREE TO USE!
No hidden fees, no subscriptions, no limitations. Enjoy all features completely free!
📧 SUPPORT:
Having issues? We’re here to help!
- Click 👎 to report problems
- We continuously improve based on your feedback
⭐ If you find SmartLens AI useful, please leave a 5-star review! Your support helps us improve and add more features.
Features of Google Lens for Windows PC and Mac
- Image Download
- Image Detection
How to Use This Extension
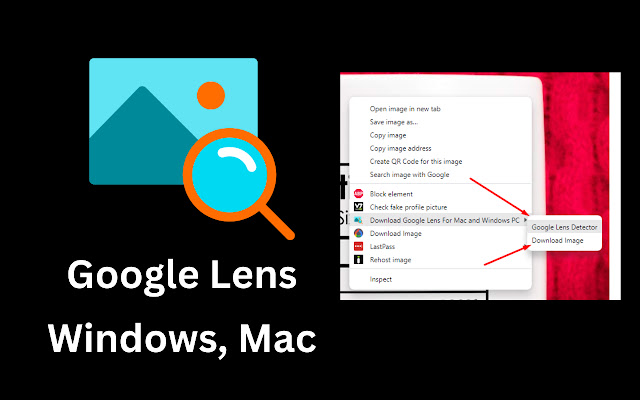
Step 1: Install the “Google Lens for PC, Windows, Mac” extension in your Chrome browser. Once installed, right-click on any image.
Step 2: In the context menu, you’ll see the “Google Lens for PC, Mac, and Windows” option. Under this, there are two sub-options: “Detect Image” and “Download Image.”
Step 3: Simply select your preferred option and proceed. Enjoy!
How To Install Google Lens on PC (Windows & macOS)
Prerequisites:
- A PC running Windows or macOS.
- Stable internet connection.
Steps: Install the BlueStacks Android Emulator
For Windows:
- Visit the official BlueStacks website.
- Click on the Download BlueStacks button.
- Once downloaded, run the installer and follow the on-screen instructions.
For macOS:
- Visit the official BlueStacks website.
- Click on the Download BlueStacks for Mac button.
- Once downloaded, open the .dmg file and drag the BlueStacks icon to the Applications folder.
2. Setup BlueStacks
- Launch BlueStacks from your applications.
- Sign in using your Google account. If you don’t have one, you’ll need to create it.
- Complete the initial setup process, including choosing your language and other preferences.
3. Install Google Lens
- On the BlueStacks home screen, click on the Play Store icon.
- In the search bar, type “Google Lens” and press enter.
- From the search results, click on the Google Lens app.
- Press the Install button.
- Wait for the installation to complete.
4. Use Google Lens
- Go back to the BlueStacks home screen.
- Click on the Google Lens app icon to launch it.
- Grant the necessary permissions when prompted.
- You’re now ready to use Google Lens on your PC!